

เป็นเรื่องที่น่าปวดหัวอยู่ไม่น้อยสำหรับการสร้าง Template ด้วย CSS เพราะว่าการแสดงผลของ Browser แต่ละเจ้ามีข้อกำหนดที่ไม่เหมือนกัน ทำให้การแสดงผลของ Browser ก็แตกต่างกันไปด้วย ตรงนี้แหละคือความ ยากของ CSS ทำให้หลายๆคนถึงกับถอดใจไปเลยก็มี สิ่งที่ผมจะแนะนำท่านต่อไปนี้เป็นเพียงหลักการ อย่างง่าย เท่านั้น พอเป็นแนวทางในการเรียนรู้เรื่องนี้ต่อไปครับ....
การกำหนด template ให้กับเว็บไซต์มี div หลักๆดังนี้ Container, Header, Nav, Main, Footer ก่อนอี่นสร้างไฟล์ขึ้นมา 2 ไฟล์ คือ template.php กับ style.css
ไปที่ไฟล์ template.php สั่งนำเข้า หรือ include ไฟล์ style.css ระหว่างเท็ก <head></head>
โครงสร้างแรกจะเป็นตามรูปนี้

เพิ่มเติม tag div ระหว่าง <body>ตรงนี้</body>
HTML Code
ไฟล์ template.php
HeaderContent - Sidebar
จากนั้นก็กำหนด CSS ให้กับ div หลักก่อนดังนี้
ไฟล์ style.css
body{
margin:0 auto;
background:#eeeeee;
}
#container{
width:980px;
margin:0 auto;
}

#header{
height:90px;
}

#nav{
height:30px;
}

#main{
width:980px;
height: auto;
}

#footer{
clear: both;
width:980px;
height:40px;
}
เพิ่มเติม เมนู ให้กับ id Nav
เพิ่มเติม css ให้กับเมนู
#nav{
height:30px;
padding-bottom: 9px;
}

#nav ul{
list-style: none;
height:30px;
padding:0px;
margin:0px;
}

#nav ul li{
float:left;
margin:10px;
}
จากนั้นก็แบ่ง Main เป็นสองส่วน ซ้าย กับ ขวา ตามรูป

แบ่ง Main เป็นสองส่วน ซ้าย กับ ขวา ด้วย main_left , main-right ใส่ content ใน main_left ใส่ sidebar ใน main_right เพิ่มเติม tag div ลงไปดังนี้
ไฟล์ template.php
Content
เพิ่มเติม css ด้านซ้าย main->main_left->content ด้านขวา main->main_right->sidebar
ไฟล์ style.css
#main{
width:980px;
height: 400px;
}

/*-------------------MAIN_LEFT -> CONTENT-------------------*/
#main_left{
float:left;
width:670px;
text-align: left;
}

#content{
clear: both;
width:auto;
height:auto;
min-height: 400px;
border:1px solid #dddddd;
padding:10px;
background: #ffffff;
font-size: 14px;
}

/*-------------------MAIN_RIGHT -> SIDEBAR-------------------*/
#main_right{
float:right;
width:300px;
}

#sidebar{
clear: both;
width:auto;
height:auto;
min-height: 400px;
border:1px solid #dddddd;
padding:10px;
font-size: 14px;
text-align: left;
}
ตอนนี้ถ้าเปิดด้วย firefox เพจก็จะอยู่ตรงกลางของ browser ไม่มีปัญหาอะไร แต่ถ้าเปิดด้วย ie เพจจะอยู่ติดขอบด้านซ้าย ดังนั้นเพื่อให้เพจอยู่กึ่งกลางของ browser เราจะอัพเดท tag div ด้วยการเพิ่ม div เข้าไปครอบ tag div ทั้งหมดเอาไว้แล้วกำหนดให้ align = center
ไฟล์ template.php
tag div ทั้งหมดของเพจอยู่ภายในนี้....
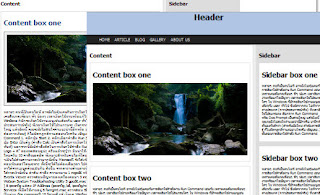
ตอนนี้เพจของเราก็จะอยู่กึ่งกลางของ browser ใช้ได้ทั้ง ie6, ie7, firefox ส่วน browser ตัวอื่นไม่ได้ทดสอบครับ เพิ่มเติม box เข้าไปสอง box ที่ sidebar ดังนี้
ไฟล์ template.php
เพิ่มเติม css
ไฟล์ style.css
#sidebar_boxone{
clear: both;
width:auto;
height:auto;
border:1px solid #dddddd;
background: #ffffff;
padding:10px;
min-height: 200px;
font-size: 14px;
text-align: left;
}

#sidebar_boxtwo{
clear: both;
width:auto;
height:auto;
border:1px solid #dddddd;
background: #ffffff;
padding:10px;
min-height: 200px;
font-size: 14px;
text-align: left;
}
เพิ่มเติม content box เข้าไปสอง box ที่ content ดังนี้
ไฟล์ template.php
เพิ่มเติม cssSidebar
Content box one
Content box two
ไฟล์ style.css
#content_boxone{
clear: both;
width:auto;
height:auto;
border:1px solid #dddddd;
padding:10px;
min-height: 200px;
font-size: 14px;
text-align: left;
}

#content_boxtwo{
clear: both;
width:auto;
height:auto;
border:1px solid #dddddd;
padding:10px;
min-height: 200px;
font-size: 14px;
text-align: left;
}
เพิ่มเติมลิงค์ ให้กับเมนู กำหนด CSS class="current" ให้กับลิงค์ Home เพื่อ highlight สีให้เกิดความ แตกต่างจากหน้าเพจอื่นๆเมื่อหน้าเพจปัจจุบันเป็นหน้า HOME เมื่อสร้างหน้า ARTICLE ก็ย้าย class="current" ไปไว้ตรงลิ้งค์ ARTICLE แทน หน้าเพจอื่นๆก็ทำเช่นเดียวกันครับ
ไฟล์ template.php หน้า HOME
ไฟล์ template.php หน้า ARTICLE
เพิ่มเติม css เพื่อ highlight หน้าเพจปัจจุบัน ไฟล์ style.css
#nav ul li a{
color:#2CD2D3;
text-decoration: none;
}

#nav ul li a:hover, #nav ul .current{
color:#ffffff;
}
สุดท้าย โค้ดที่เสร็จแล้ว HTML Code ไฟล์ template.php
Home HomeContent
Content box one
Content box two
โค้ดที่เสร็จแล้ว CSS Code ไฟล์ style.css
body{
margin:0 auto;
background:#eeeeee;
}
#container{
width:980px;
margin:0 auto;
}

#header{
height:90px;
background: #B0C5E3;
}

#nav{
height:30px;
background: #222222;
color:#ffffff;
padding-bottom: 9px;
}

#nav ul{
list-style: none;
height:30px;
margin:0 auto;
}

#nav ul li{
float:left;
margin:10px;
}

#nav ul li a{
color:#2CD2D3;
text-decoration: none;
}

#nav ul li a:hover, #nav ul .current{
color:#ffffff;
}

#main{
width:980px;
height:auto;
}

#main_left{
float:left;
width:670px;
text-align: left;
}

#content{
clear: both;
width:auto;
height:auto;
min-height: 400px;
border:1px solid #dddddd;
padding:10px;
background: #ffffff;
font-size: 14px;
}

#content_boxone{
clear: both;
width:auto;
height:auto;
border:1px solid #dddddd;
padding:10px;
min-height: 200px;
font-size: 14px;
text-align: left;
}

#content_boxtwo{
clear: both;
width:auto;
height:auto;
border:1px solid #dddddd;
padding:10px;
min-height: 200px;
font-size: 14px;
text-align: left;
}

#main_right{
float:right;
width:300px;
}

#sidebar{
clear: both;
width:auto;
height:auto;
min-height: 400px;
border:1px solid #dddddd;
background: #dddddd;
padding:10px;
font-size: 14px;
text-align: left;
}

#sidebar_boxone{
clear: both;
width:auto;
height:auto;
border:1px solid #dddddd;
background: #ffffff;
padding:10px;
min-height: 200px;
font-size: 14px;
text-align: left;
}

#sidebar_boxtwo{
clear: both;
width:auto;
height:auto;
border:1px solid #dddddd;
background: #ffffff;
padding:10px;
min-height: 200px;
font-size: 14px;
text-align: left;
}

#footer{
clear: both;
width:980px;
background: #222222;
color:#ffffff;
padding-top:10px;
height:40px;
}
พอเป็นแนวทางในการสร้าง Template website เท่านั้น ที่เหลือท่านก็จะต้องไปศึกษาCSS เพิ่มเติมเอานะครับ....


หวัดดีครับของคุณมากเลยนะครับสำหรับ ความรู้ที่ทำการแบ่งปันก้ันนะครับ
ตอบลบเป็นแนวทางที่ดีครับ
ขอบคุณสำหรับคำแนะนำดีๆครับ ผมคิดว่ามีหลายคนนะครับที่เข้ามาดูแต่ไม่ได้ comment แค่นั้นเอง
ตอบลบขอเป็นอีกหนึ่ง comment ที่ยืนยันว่า content ที่เขียนมีประโยชน์ครับ ขอบคุณครับ.
ตอบลบเป็นประโยชน์มากๆ เลยค่ะ ขออนุญาตเอาโค้ดต่างๆนี้ ไปเป็นแนวทางในการทำโปรเจคนะคะ ^^
ตอบลบThank มากๆ
ตอบลบผมอยากลองหัดเขียน ใช้โปรแกรมอะไรเขียนคับ
ตอบลบ